Open Windows 10 settings. View basic information about your Windows computer. Reinstall Windows without data loss
The ability to switch to a dark theme has been one of the most anticipated features of Windows. After all, with a lack of light, such a color scheme is less tiring for the eyes. Previously, it was possible to set the black background of the interface to the tenth version of the OS. But the developers listened to the users and finally added a simple official way in the Windows 10 Anniversary Update.
After opening the section "Settings" → "Personalization" → "Colors", you will see the item "Select a default application mode" at the bottom. If you activate the dark mode here, then the background of the Windows interface will partially switch to black. The same applies to some standard and third-party programs from the Windows Store.
Separately, you can enable a dark theme in the Edge browser. To do this, click on the three dots in the upper right corner of the program window, then click "Options" and under "Select Theme" select "Dark".
By the way, if you prefer Google Chrome, you can download the dark theme from the Google store and even install .

Sitting at the computer in the dark, you might notice how quickly your eyes get tired. This is because at night the display becomes too bright for a room without sunlight.
Microsoft took care of this problem and in the Windows 10 Creators Update added a special monitor color mode "". It can be configured in Settings → System → Display.
When this mode is active, the system changes the temperature of the colors so that they do not tire the eyes in a dark room.

As you use Windows, residual files and other junk accumulate in it, which clogs your hard drive and slows down the OS. There are many third party utilities that solve these problems. But until recently there was no standard solution.
After upgrading to Windows 10 Creators Update, the system appears, which clears the device's memory. You can activate and configure it in the section "Settings" → "System" → "Storage" under the item "Storage control".

Windows 10 has a set of standard apps that let you access music, videos, web pages, and other files without third-party software. For each file type, the system defaults to one of these pre-installed programs (or warns that it is not supported). This is why, for example, when you click on a downloaded music track, Windows immediately plays it in the Groove player.
But if you want to replace the standard player, browser and other programs with third-party ones, it is most convenient to do this in a special settings section. Open Settings → Applications → Default Applications and select here the programs you have installed that Windows should use by default for various tasks.

A password set on a Windows account protects personal data and user settings. This feature will be relevant for you if unauthorized persons have physical access to the computer. Of course, if you try hard, such protection can be bypassed. But in most life situations it will be enough.
You can put it, remove it or reset it if you suddenly forget it, in the section "Settings" → "Accounts" → "Login options".

By default, when you launch File Explorer in Windows 10, a quick access window opens to frequently visited folders and recently viewed files. Perhaps this option suits you completely. But in previous versions of the OS, “Explorer” immediately opened the “This PC” section, and there are users who are used to it.
If you're one of them, or if you're just more comfortable seeing your local drives right away in File Explorer, you can revert to the old view. To do this, open "Explorer", click "View" → "Options" and in the "Open File Explorer For" item, select "This PC".

Windows has long allowed you to hide files and folders, making them invisible. Thus, it is convenient to hide directories with important content so that you do not accidentally delete anything you need. You can make an object visible or hidden through the context menu: just right-click on the folder or file, click "Properties" and check or uncheck the "Hidden" item.
In addition, for convenience, the system can display its extension at the end of the name of each file: .exe, .png, .docx, or a letter designation of any other format.
By default, Windows 10 does not show items that have been hidden by the developers or the user, just like file extensions. But you may need to display them. For example, to get into a hidden folder or view the format of a photo.
To enable showing hidden objects or file extensions, open Explorer, click View and check the required items: Hidden Items or File Name Extensions.

Windows 10 displays notifications like a typical mobile OS. So that nothing distracts you, you can configure them in Settings → System → Notifications and actions. Here you can choose what type of messages will appear on the screen, and set notification options separately for each application.
In this section, you can also select buttons for quick actions that will be displayed on the notification panel. They allow, for example, to instantly activate the night mode of the display, adjust its brightness or add notes to OneNote.

Errors in the system or third-party software, as well as incorrect user actions can cause Windows to crash.
Fortunately, there is a mechanism that returns the OS to its normal state. It's about the recovery service. It creates a copy of important system components every time you update Windows, a driver, or install a new program and saves it to your hard drive. In most cases, you will be able to restore your system to normal from these backups (restore points).
To go to the service settings, enter “Recovery” in the Windows search, click on the result and click in the “System Restore Settings” window that opens.
Once on the "System Protection" tab, select your system drive (usually drive C), then click on the "Configure" button and enable system protection. After that, specify the amount of disk space that will be allocated for storing backups. The more space, the more restore points you will have at your disposal. When it ends, new points will replace the old ones. After everything click OK.
Now, if the need arises, you can by returning to the "System Protection" tab. To do this, there is a button "Restore".
But keep in mind that backups do not contain a complete Windows image, but only important system files.
10. Screen calibration

Windows has a built-in display calibrator that you can use to improve color quality. The program will display simple step by step instructions. Having done everything as she tells you, you are in the best way. No special knowledge is required for this.
To launch the calibrator, type the word “calibration” in the system search and click on the found element. After that, follow the prompts of the system.
11. Activity log settings
The Windows 10 April 2018 Update added the Activity Log feature to the system. With its help, you can at any time see which documents and web pages you have interacted with in recent days, and return to working on them. Moreover, the log can display activities not only from the current computer, but also from all other devices connected to your Microsoft account.

To set up Activity History, go to Start → Settings → Privacy → Activity Log. Check the "Allow Windows to collect activities from this computer" checkbox if it was not enabled by default. Then check the "Let Windows sync my activities from this PC to the cloud" checkbox if you want data about the current computer to appear on other devices associated with it.

When you're done, click on the icon next to the Start icon on the taskbar. A timeline will appear where you can see previously opened documents.
12. System update options
Windows can be annoying with offers to upgrade at the most inopportune moment. And sometimes it restarts the computer when you do not expect it at all. To insure yourself against such cases, set up the so-called "Activity Period". This is the time of day during which you usually work on your computer. Windows will not update during the specified hours.
To customize Activity Time, go to Start → Settings → Windows Update and click Change Activity Time. Specify the schedule for working at the computer and save the changes.

If you are trusting your computer so that someone else can work on it for a while, then it is better to disable the Control Panel and Application Settings in Windows 10 OS on the PC. The control panel and application settings are two main interfaces where all the default settings in the Windows 10 operating system are located and they can be changed and they can also be confused. Thus, it is recommended to turn off all settings when you allow any user to work on your PC.
Application settings in Windows 10 actually means that you have replaced the traditional dependency control panel, and thus most of the default features and settings in the control panel are enabled in the Settings application in Windows 10. If you have customized the Control Panel or application settings like more interesting for you at the same time it will depend on who is using the system.
Therefore, in order to secure your system from such intrusions, we could consider a few simple ways so that you know how to disable and enable system settings according to your needs.
Method 1: Enable or disable settings through the registry
Just like Group Policy, and if you have Windows 10 Home installed, the Windows Registry can help you enable or disable system settings to trigger certain changes. But before editing it, we recommend that you back up the registry, as this can be fatal if anything goes wrong with the registry modification. The method is described below in simple steps:
Step 1. type Regedit.exe in the start menu/taskbar search box to open the registry editor. Click the “Yes” button if the User account verification screen appears.

Step 2 Once the Registry Editor opens, navigate to the following section:
HKEY_CURRENT_USER\Software\Microsoft\Windows\CurrentVersion\Policies\Explorer
Step 3 In case there is no “explorer key”, then right-click on the “Policy” button. Click the "New" button and then "key" and enter the name of the new key as the explorer.
Step 4 On the right side of the panel, right-click on an empty space. Select "New" and then "DWORD (32-bit) value". Rename the new set value as "NoControlPanel".

Step 5 Once you have done this, double click on “NoControlPanel” and set the value to 0 to disable the Control Panel and application settings in general. You can enable them again by changing the value from 0 to 1.

Method 2: Enable or disable settings through group policy
The Local Group Policy Editor is a feature with which you can manage and edit the local policies that are stored on your system, and here we wanted to use it to enable and disable settings in Windows 10. Although this is a bit risky if you are not adept and you have problems with your system, so be careful when working with the local group policy editor. Otherwise, it can lead to fatal changes to your system.
The method is executed like this:
Step 1. You need to type gpedit.msc in the search box and press "Enter" to open the Local Group Policy Editor.

Step 2. Click on the “User Configuration” tab on the left side of the group list.
Step 3 Select “Administrative Templates” from the context menu and then click on the “Control Panel” button.
Step 4 Now, you can see several names with entries on the right side of the panel.
Step 5 Look for a policy called "deny access to control panel and PC settings".

Step 6 Double click on “Deny access to control panel and PC settings” for the login policy and after that you will see the properties dialog box.
Step 7 From the next "properties" window; Select the option “Enable disable settings in Windows 10.

Step 8 After selecting an option, click on the “apply” button to save the changes.
So, from now on, no random user will be able to open your settings without your permission, so your system will be safe.
Note: if you want to enable the settings again, select the “disable” option to make the settings appear again.
Method 3: Turn on or off using the Control Panel
If you don't want to go through the hassle of editing the registry and group policy to disable or enable system settings, there are two registry tricks that can be used as an alternative to disable and enable system settings, such as a third party program.

Of the two files, one hack disables access to the control panel and the other hack will allow you access. The two registry files will be compressed into a zip file that can be downloaded from the internet.
Enable or disable the use of Windows
Read the instructions below to know how to make them work:
Step 1. Download Windows Control Panel Hacks from the Internet, which is actually a zip file containing two files.
Step 2 Click on the zip file and there you will see two files, one to disable access and the other to access the control panel.
Select the file according to your needs and your settings will be restricted from opening without your permission.
Conclusion:
Most of the control panel tweaks and app settings are included in Windows 10 lately to make the user experience more comfortable. Since the regular access control panel is a little confusing, changing the app settings in Windows 10 shows the settings and built-in features with a clear difference, and you can easily select options.
Thus, the methods described in this article will surely help you disable and enable system settings as per your requirement to ensure security against misuse and exploitation of the system.
You can view the characteristics of a computer on Windows 10 by holding a few keys. Most of the information is presented in the Task Manager. You just need to know where to look. The rest of the data can be retrieved from the Options snap-in.
Today is not the best day to look into the System Properties for the specified purpose, but we will do that too. To ensure that readers have a full range of knowledge on a given topic. You will see that you can find out almost everything about your PC without resorting to the services of specialized utilities.
Command line
The command line is becoming more and more like a run tool. The only difference is the call method:
- Command line via Win + X.
- Run - Win + R.
Both tools can be called crosswise. Command line from Run via cmd, and Run from command prompt via C:\\Windows\\system32\\rundll32.exe shell32.dll,#61. You must understand that both instruments are very similar to each other. Let's find out the characteristics of the OS:
What do we learn from this screen? A lot of things:
- The professional version of ten is used.
- Anniversary update 1607 installed.
- Assembly - 14393.693.
But these data are still scarce. Why Billy Gates did not indicate the bit depth remains a mystery. Generally speaking, Microsoft has taken a course to get rid of 32-bit hardware, so that in 5 years no one will have such questions as we do.
Via System Properties
Press Win + Break to see a little more information.

Some data about iron is already presented here. In addition, we see that the system bit depth is 64 bits. Here's what you can understand from the screen:
- 3.2 GHz Intel i5 generation processor.
- The RAM size is 16 GB, of which so much is available.
- The name of the PC and its working group have become known.
Actually, that's all. In our opinion, it is bad that the number of cores, the type of graphics, the placement and occupancy of DIMM slots, and the speed of memory access are not indicated. On some laptops, this combination does not work (given the fact that sometimes you have to press Fn). In this case, go through the Control Panel:

Via Options

In fact, we see the same thing as in the Properties ...
Task Manager


It remains for us to learn something about the graphic part of the PC.
Other information via DirectX dialog
- win+r.
- We type dxdiag.
- Enter.
Motherboard
Already in the first window we see the missing information.

After the language, the data comes in order:
- Motherboard manufacturer.
- Motherboard name.
- BIOS firmware version.
- Swap file size.
- DirectX version.
Graphic arts
The following screenshot demonstrates the graphics capabilities.

In order, here are:
- Graphics type. In this case, it is the HD Graphics 530 built into the processor.
- Memory.
- The current screen resolution.
You can also look at other bookmarks, but the information taken from there will tell a lot only to professionals.
What else?
What more could you wish for than what we already have? Well, I would like to have an idea about the following parameters:
- The name of the processor socket.
- The number of slots for graphics accelerators.
- hard drive interface.
In fact, many will be limited to this. That is, we have already received all the information from the system utilities, and now we are thinking where to get the rest. Usually resort to the help of AIDA. Here is an example of CPU data.

The socket type is now known - LGA 1151. With these data, you can look after a new processor. Could this information have been dispensed with? Oh sure. Third-party utilities are needed by professionals whose time is money. Billy Gates will help mere mortals get system settings in Windows 10.
When installing Windows 10, the user may think that this OS is the ideal operating system. But there is no limit to perfection. For personal use in Windows 10, you can and should disable a good part of the components in order to free up more PC resources.
Why manual tuning is better and better than automatic
Obviously, after installing a new system, you need to set up your computer with your own hands, and not with one or two one-button programs. All applications are created according to a template, they work according to one scenario with possible small branches.
No program will do what you need specifically. For example, only the user can choose the design to his liking, disable unnecessary services, defragment individual hard disk partitions.
In addition, no program will be able to set up the entire system: some work is aimed at cleaning the disk and registry, others - to optimize services, connect to the Internet, free from "surveillance" and data collection, and so on.
I often help reinstall systems and regularly do this on my computer. I noticed a long time ago that programs that optimize in one click miss a lot of really important things. Very few applications turn off services, I have not met one that would turn off the visual effects of the system and so on.
Settings to be made after installing Windows 10
Windows Store limitation in downloading updates
The Windows Store is a platform through which you can purchase and install free and paid Windows apps. In addition, the "Store" constantly updates installed applications, because when you purchase a program or game, you get a lifetime service. But in some cases, these updates can disrupt the system, take away some resources of the hard drive and RAM, so it's better to disable auto-update:
- In the search, enter Store and select the best match. In the search, enter Store and select the best match
- In the Store window, click on the ellipsis button. Select "Settings".
 In the "Store" window, click on the ellipsis button and select "Settings"
 - In the "Settings" we rearrange the toggle switch in the "Application Update" column to the "Off" state, and then restart the computer.
 In the "Settings" we rearrange the toggle switch in the "Update applications" column to the "Off" state.
Stopping unnecessary services
Services are background processes that keep devices running and act as intermediaries between devices and the operating system. However, some services may work even if there is no device they are communicating with. For example, fax or Bluetooth, which most computers do not have. There is a whole list of services that can be painlessly disabled:

List of services that can be safely disabled on Windows 10:
- "Fax";
- NVIDIA Stereoscopic 3D Driver Service (for NVidia video cards, if you are not using 3D stereo images);
- "Net.Tcp Port Sharing Service";
- "Working folders";
- "AllJoyn Router Service";
- "Application Identity";
- "BitLocker Drive Encryption Service";
- "Bluetooth Support Service" (if you are not using Bluetooth);
- Client License Service (ClipSVC, Windows 10 Store Apps may not work properly after being disabled)
- "Computer Browser";
- Dmwappushservice;
- "Geographic Location Service";
- "Guest shutdown service (Hyper-V)";
- "Pulse Service (Hyper-V)";
- "Hyper-V Virtual Machine Session Service";
- "Hyper-V Time Synchronization Service";
- "Data Exchange Service (Hyper-V)";
- "Hyper-V Remote Desktop Virtualization Service";
- "Sensor Surveillance Service";
- "Sensor Data Service";
- "Sensor Service";
- “Features for connected users and telemetry” (this is one of the options to disable Windows 10 “tracking” of the user);
- "Internet Sharing (ICS)" (provided that you do not use Internet Sharing features, for example, to distribute Wi-Fi from a laptop);
- "Xbox Live Network Service";
- Superfetch (assuming you're using an SSD)
- "Print Manager" (if you do not use the printing features, including the built-in Windows 10 printing to PDF files);
- "Windows Biometric Service";
- "Remote registry";
- "Telephony";
- "Telephone communications";
- "Secondary login" (assuming you don't use it).
Video: How to disable unnecessary services in Windows 10
Checking and installing missing drivers
During the installation of Windows, standard applications are installed that open only the basic capabilities of the device. For maximum PC performance, it is necessary that the latest drivers are installed in the system.
- Press the key combination Win + X and select "Device Manager" in the drop-down menu.
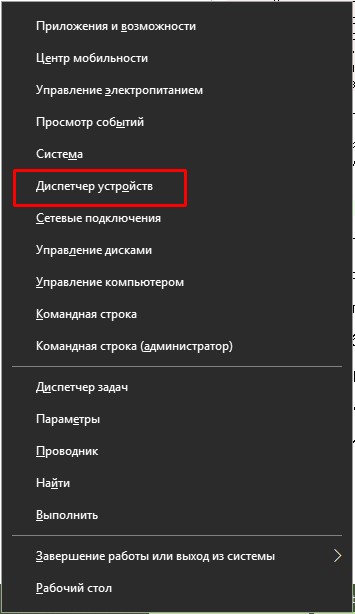 Press the key combination Win + X and select "Device Manager" in the drop-down menu
 - Open the tab with the device, right-click and select "Update driver".
 Open the tab with the device, right-click and select "Update driver"
 - We select "Automatically search for driver updates" and wait until the wizard finishes its work. Then we restart the computer.
 Select the item "Automatically search for driver updates" and wait until the wizard finishes its work
 - Update drivers for the following devices:
- "System Devices";
- "IDE controllers";
- "Video adapters (video cards, video controllers)".
- We restart the computer.
Video: how to update the driver through the "Device Manager"
Checking and installing system updates
The user needs to keep the operating system up to date. To do this, you need to download updates as often as possible. Update components contain important files for the system, virus databases for Defender, and much more.

Disabling auto-update
If for some reason, for example, a small hard drive is installed in your computer, you do not want Windows to keep its components up to date, auto-update can be disabled. However, keep in mind that this is not recommended.

Disabling spyware
With the release of Windows 10, some users have begun to sound the alarm about how much data is being sent to Windows for analysis. It should be noted right away that no one monitors personal passwords and credit card numbers. The system simply collects some metadata to improve its performance. Turning off the collection and sending of data is quite simple, you just need to dig a little in the "Parameters" and "Defender" settings:
- Open Settings and go to the Privacy applet.
 Open "Settings" and go to the "Privacy" applet
 - In the "General" tab, we translate all the toggle switches to the "Off" position.
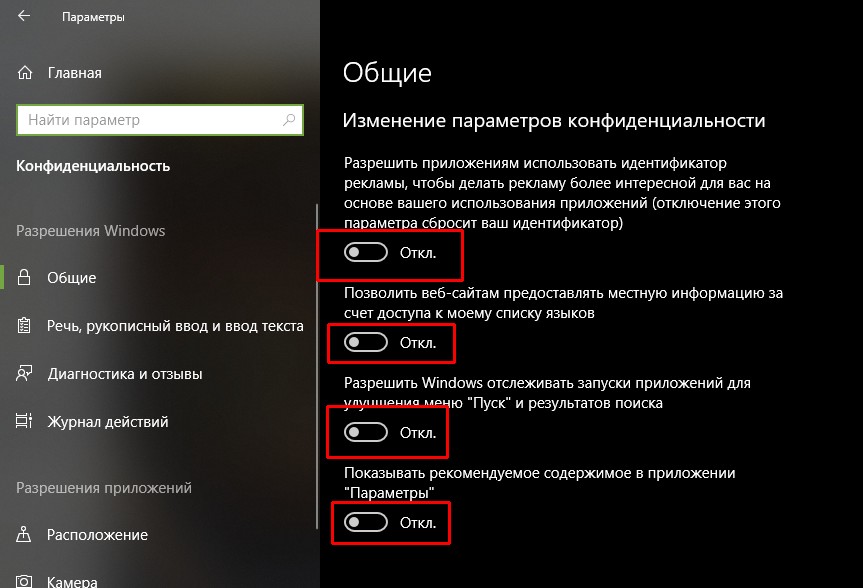 In the "General" tab, we translate all the toggle switches to the "Off" position.
 - In the "Speech, handwriting and text input" tab, click on "Turn off speech services and input suggestions".
 In the "Speech, handwriting and text input" tab, click on "Turn off speech services and input suggestions"
 - In the "Diagnostics and reviews" tab, we also transfer all the toggle switches to the "Off" state.
 In the "Action Log" tab, uncheck the box "Allow Windows ..."
 - We restart the computer.
Experience shows that different versions and builds of operating systems track different data, so the Privacy applet may contain more or less tracking settings. The system update for a specific period also plays a role. The location of the toggle switches in the tabs may differ. It is recommended that you review the "Privacy" section carefully.
Garbage removal
After installing the operating system, there is usually no garbage in it. But if the new OS was installed without overwriting the old one, the Windows.old folder may well appear on the system disk, which cannot be deleted using simple methods. The Disk Cleanup utility will help with this.

Minimizing the set of effects
Visual effects (taskbar animation, window shadow casting, etc.) are certainly beautiful and pleasing to the eye, but they have too much impact on RAM and video memory. It's better to turn them off:

Video: how to turn off visual effects
Disable background apps
Windows 10 has a lot of standard apps that, like services, run in the background. They cannot be blamed for excessive use of resources, however, these programs are best disabled:

Optimizing and making a freshly installed operating system work is very important and quite simple. It is enough to disable everything unnecessary, and Windows will be configured for maximum performance.
As it turns out, the tenth version of Windows announced last year is far from perfect. The factory settings of Windows 10 are such that a huge number of unused services are running in the system, and components that are completely unnecessary for the average user are involved. Needless to say, it is possible and necessary to fight against it. When disabling everything superfluous, even the Windows 10 key is not needed. Let's dwell on the most important aspects of performance.
Tuning Windows 10 for Maximum Performance: The Basics
Let's start with the fact that it is not known why the developers of the new system tried to include in the default operation the maximum of what it is capable of. Naturally, on machines that correspond to the minimum configuration, this does not affect in the best way.
If anyone noticed, even when entering where the version of the installed system and the main technical data regarding the processor and RAM are displayed, the performance index often has a rather low indicator. No need to build illusions. This is not due to the computer configuration, but only to the fact that a large number of services and background processes are running in the system, which give the maximum load on system resources. Now the setting for maximum performance will be considered, more precisely, actions that can reduce the load on the same processor, RAM or even a hard drive.
Disable visual effects
Some users mistakenly believe that there are fewer visual effects in the "ten", compared to the same "seven". This is a clear misconception. Windows 10 uses render mode to a much greater extent. In fact, if you look at it thoroughly, it's just a storehouse of effects that have a strong enough effect on RAM and take up a lot of space even in the memory of a graphics chip. The most banal question arises: “Is it possible to get rid of this?” Yes, you can, and in the simplest way.

To configure, we use the standard Start menu, where we select the system partition, and then go to additional parameters. In the properties window there is a tab for additional settings, where you should select the item to ensure the best performance (the default is to provide the best view). It goes without saying that each effect can be turned off in turn. The view, however, will suffer quite a lot from this, but for machines that are too weak, this can be a pretty good solution to eliminate the problem of reducing the load on system resources.
Disable unused startup services
Now a few words about one of the most important sections. This is autoload. As the name implies, all services and processes are collected here that start automatically when the operating system itself boots. And many of these components in the process of work remain unclaimed.
At this stage, configuring Windows 10 for maximum performance means disabling them completely (within reason, of course).

To enter the startup options, use the msconfig command, which is entered in the Run menu field (Win + R). There is a tab with the same name, on which all automatically loaded processes are displayed. Disable everything we have. You can leave only the antivirus service (if one is installed on the system). Everything else can be left unused. Naturally, after saving the changes made, the system will prompt you to reboot. We agree, and after a restart, we look at how Windows behaves. Better? Yes! But that's not all.
Disable unnecessary components
Now you should disable Windows 10 components that are not included in the section of automatically loaded processes, but use system resources no less. Again, for such fine-tuning, the Windows 10 key is not needed, however, as for all other actions.

We go to the "Control Panel", where we select the section of programs and components. In the Windows components menu, disable unused services. For example, an activated Hyper-V module is completely unnecessary if the terminal is not supposed to use it at all. You can easily disable print services if the printer is not installed, etc. In general, you need to look and determine the shutdown, based on what is needed in the work, and what will not be explicitly used.
Disable overwriting information when exiting hibernation mode
Another setup-related issue relates to, more simply, the “sleep” state of a computer or laptop with reduced power consumption. The fact is that the system constantly overwrites the information file, which stores data about all currently open applications. And, accordingly, it can be quite large. In addition, the rewriting time becomes quite long.

But if we talk about SSDs, they do the job very well without it, and a constantly overwritten file is simply not needed here. So it's time to get rid of it. We use the key combination Win + X, after which we select the command line (you can also do this from the Run menu with the cmd command). Next, enter the line powercfg -H off and press the enter key (Enter). The most important thing in this situation is to run the command prompt as an administrator. Otherwise, nothing will work.
Disable defragmentation
When working with solid state drives that have a higher data reading speed, it is also recommended to disable background defragmentation (arranging the most frequently used files and called programs with moving to the fastest areas of the hard drive). The speed of work and so on top.

To begin with, we call the “Run” menu (Win + R) in the field of which we prescribe the dfrgui command. Next, select the SSD, click the change settings button, and then uncheck the checkbox for scheduled defragmentation.
Disable indexing
For SSD drives, one more important setting should be taken into account - indexing. In the active state, it negatively affects the work.
To disable this option, enter the "Computer" menu, select the SSD, use the properties section and turn off the file indexing permission setting.
Disable update
Quite often, although not always, the system can slow down when installing the latest update packages, which, by the way, are not always installed correctly in the system, which can lead to a complete failure in terms of performance. In general, if you look closely, in most cases these are security updates, less often - specific platforms like the Microsoft .NET Framework, even less often - office products and device drivers.

The service is simply disabled in the updates and security section, which is entered through the system settings menu.
Disable Windows Defender
Another stumbling block is the built-in Windows Defender, which appeared in the eighth version. Often, working in it not only affects the same performance index and the operation of the system as a whole, but also “shows off” when installing specific software that requires changes to system files and settings, considering it potentially unsafe, although in fact it is not. is.

To disable this component, enter the standard "Control Panel" and select the appropriate section to disable. Note that if a regular antivirus is installed in the system, this service will be blocked automatically.
Delete unnecessary files
Also, setting Windows 10 for maximum performance involves removing computer debris in order to provide increased access speed to any type of hard drive. You can, of course, manually delete temporary files from, but this is far from all that can be done.

And in this case, it is better to use the built-in disk cleanup utility. Access to it is carried out through the right click on the letter of the section with a choice of properties. The window has a “General” tab, where the button for activating the cleaning process is located. With all this, you should tick off everything that is in the field above. In some cases, when there will be no return to the previous system, you can delete its files (and this is about 25-30 GB).
How to Tune Windows 10 for Maximum Performance: Third-Party Utilities
Finally, one of the most important points. The Windows 10 registry plays a key role in maximizing performance. The first is system boot. If anyone does not know, at startup the system performs a full scan of it (on which, in fact, most recovery methods are based). The larger the registry, or rather, the number of entries and keys present in it, the longer the process takes. Secondly, the Windows 10 registry itself may contain incorrect or outdated keys, left over, say, after uninstalling some programs.

Editing records manually is an absolutely thankless task. Therefore, many third-party developers have specially created programs for optimizing Windows systems that fix all errors automatically. Any such complex application has a special module for searching for obsolete or erroneous registry entries, and in some of the most advanced utilities you can also find tools to defragment the system registry to reduce its size and speed up access to it. It works, however, a little differently than defragmenting a hard drive, but that's not the point.
Among all that is offered on the modern market for this type of software, utilities like Advanced System Care, AVZ PC Tune Up, Glary Utilities, CCleaner and many others are worth noting. Ultimately, the user is only required to press the buttons to start scanning the system and fixing the identified errors or failures, nothing more. And of course, only the key points related to improving system performance are considered here. It's simply impossible to take everything into account.


Popular
- Why PC-Radio does not work: the main reasons and their solution Pc radio why there is no sound
- Mind map software iMindMap Mind map software
- Windows System Restore Set up automatic creation of restore points
- Why PC-Radio does not work: the main reasons and their solution
- Programs for creating mind maps
- Mind Mapping Software iMindMap Best Mind Mapping Software
- Web design for beginners
- Yandex disk for collaboration
- How to secure your computer
- Web design lessons from scratch