View basic information about your Windows computer. View basic information about your Windows computer Select Windows 10 settings options
I have a Windows 10 operating system, it is necessary to configure something. This material will tell you a few about how to open Settings in this operating system in 4 ways.
1. Launching the Settings Menu from the Start Menu
This method is the fastest to open. Run and in its left side you can find a shortcut, clicking on which will open it.

2. Search settings
There is a search icon on the taskbar, clicking on it and entering text will open the settings menu.

3. Using the "Notification Center"
A distinctive feature of Windows 10 from earlier operating systems of the family is. Its purpose is to show what is happening on the device. It also has an integrated section for quick actions. Open by clicking on the notification area icon.
At the very bottom, you can see the quick action section, where you need to click on the tile, thereby opening the window.

4. Using keyboard shortcuts
It's even possible that the keyboard shortcut method is faster than the first one to open the settings window in Windows 10. If this method is preferable, then you just need to hold down two + (Win + Ш) keys at the same time. This action will instantly open.
Of course, there are other ways to open the "Settings" window in Windows 10, but the ones given in the guide are the fastest and easiest.
ProComputer.su
5 Ways to Open the Settings Window in Windows 10
Use the Settings shortcut in the Start Menu
The Start menu didn't make it into Windows 8 and 8.1, but after massive user backlash, Microsoft brought it back to Windows 10, albeit not quite in the way we're used to seeing it. Quite logically, the Start menu is one of the fastest ways to open the Settings menu in Windows 10.
So, open "Start" and take a look at the bottom left of the menu - there you will see a shortcut that interests us, allowing you to go to "Settings".

Use Search/Cortana
This method is not as fast as the first one, but still deserves to be mentioned. Enter the word "options" in the "Search on the Internet and in Windows" field, and as soon as the system displays the search results, press Enter or click on the corresponding result.

Use Quick Actions
Windows 10 includes a new feature called Notifications, the purpose of which is to notify the user about what is happening on their computer. In addition, this function has a number of buttons for performing quick actions.
Open the notification panel by clicking on the corresponding icon in the system tray.
At the bottom of the panel, click on "All Settings". This will open the Settings app.

Pin "Settings" to the taskbar
If you often use the settings menu, just put its shortcut on the taskbar. To do this, open the Start menu, find the Settings shortcut and right-click on it (or hold until the context menu appears if you have a touch device). Select "Pin to taskbar" from the menu.

Use keyboard shortcuts
This is the last and perhaps the fastest way. All you have to do is press the keyboard shortcut + i. This action will instantly open the Options window.
compsch.com
How to open advanced startup options in Windows 10.
Advanced Boot Options in Windows 10 allows you to access various startup options as well as system recovery options.
With their help, you can restore Windows 10 to an earlier date, restore Windows 10 using a system image, fix boot problems, open a command prompt window to perform various types of tasks, change UEFI settings, and return to a previous build of Windows 10.
There are several ways to access advanced startup options in the Windows 10 operating system. Below are four methods that will allow you to access advanced startup options in Windows 10.
Method 1 of 3
Open Advanced Startup Options with Windows Settings
Step 1: Open the Settings app. This can be done by clicking on the Settings icon in the Start menu or by using the keyboard shortcut Win+I.

Step 2: In the Settings that opens, click the Update & Security button.

Step 3: Click on the left side of the Recovery menu. In the Special Boot Options section, click the Restart now button. This will restart your computer.
Step 4: When the computer restarts, you will see the Select Action screen

Step 5: In the Select Action window, click the Troubleshooting button.

Step 6: In the Diagnostics window that opens, click on the Advanced options tile.

Method 2 of 3
Open advanced startup options using the login window.
Step 1: In the Windows 10 login window, press the power button while holding down the Shift key and press the restart button.

Step 2: When the computer restarts, you will see the Select Action screen
Step 3: In the Select Action window, click the Troubleshooting button.
Method 3 of 3
Open advanced startup options from Windows 10 desktop.
Step 1: Open the Start menu. Click on the power button.

Step 2: Hold down the Shift key and select and click the Restart option.

Step 3: When the computer restarts, you will see the Select Action screen, click the Troubleshoot button.
Step 4: In the Diagnostics window that opens, click on the Advanced options tile.
g-ek.com
How to open the Control Panel using the Windows Settings app
With Windows 8, Microsoft first introduced an alternative to the traditional Control Panel. The new Windows 10 Settings app not only includes most of the settings and options available in the classic Control Panel, but also has settings and options not found in the Control Panel.
As stated earlier, many of the classic Control Panel settings have not been moved to the new Settings app. Because of this, from time to time, we have to use the classic control panel even in new builds of Windows 10
It would be great if there was a button in Options that allows you to open the classic control panel.
Luckily, there's an easy way to open the classic Control Panel right from the Settings app. You can use the search box in Windows Settings to open the Control Panel.
Yes, to open the Control Panel from the Settings app, all you need to do is type Control Panel and then press enter.

The search bar in the settings can also be used to quickly access other sections of the control panel settings. For example, you can type Windows Update to access Windows Update and Device Manager options to open Device Manager.

Tip: Did you know that you can create a shortcut to a specific settings section on your Windows 10 desktop? Please refer to our guide.
g-ek.com
How to open settings on Windows 10
Hello. Back in Windows 8 / 8.1, Microsoft began to introduce an alternative settings menu, which should eventually replace the standard control panel. At first, both panels worked in parallel and in the eight it remained the same. But with the advent of Win10 and the following constant updates, the new settings panel gradually acquires more and more functionality, and the control panel turns off. And since everyone is used to the location of the standard "Control Panel", not everyone finds new settings. And it is for such people that this article was created.
To begin with, I offer you the option of simplifying the entry into the settings by adding them to the desktop context menu, for this you can use this instruction.

The first of the standard methods is hidden in the updated Start menu, in the lower left corner there is a gear icon, hovering over which we will see the “Settings” hint.

The second way I suggest is to use the keyboard shortcut Win + I, pressing which will open the options menu.
The third method is available if you open the notification center (it is located in the lower right corner), there is an "All options" button here, if you have not disabled it in the corresponding menu.

Well, the fourth method is available if you open "Computer", select the "Computer" tab and here click on the "Open Settings" button.

Finally, I'll tell you how to open the old control panel while it's still possible. To do this, right-click on the "Start" corner and select "Control Panel".

Look like that's it. I hope this article was useful to you, click one of the buttons below to tell your friends about it. Also subscribe to site updates by entering your e-mail in the field on the right or by subscribing to a group on Vkontakte and a YouTube channel. Thank you for your attention
Site material geekteam.pro
geekteam.pro

From version to version in Windows operating systems, the interface changes. The user has to get used to the new interface, which sometimes leads to difficulties in setting up the system. However, at a fundamental level, all operating systems from Microsoft are not very different. And all settings can be easily found in any version of Windows. Consider this using the example of opening the system properties window in Windows 10.
Hotkeys for calling the system properties window
Win+Pause/Break- invokes system properties in any version Windows from XP to Windows 10. The easiest and fastest way.

There are only two keys on the keyboard. In some laptop models, you will have to additionally hold down the key fn, because the Pause there it is placed in an additional function on the key Break.
Text command to launch basic Windows 10 system properties
Perhaps someone will find it much more complicated than the previous method. It might seem useless. However, there are situations when it is not possible to press a key combination. For example, when connecting to a computer remotely, the use of hot keys may not be available.
Via the Run applet
In this case, you can start viewing basic computer information using the command line or . The latter can be opened through the Start menu, or by pressing the Win + R key combination.
Type command:
control /name microsoft.system

It's easy to remember, and in an extreme situation it will work on any version of Windows except XP. It works in the 10th version of the system, it will probably work in many more subsequent ones. This can be much faster than looking for where the developers have removed access to the system properties this time. This command can be further simplified and simply typed

Through the command line
The same command is entered through the Windows 10 command line. It, in turn, can also be called through the “run” applet by typing cmd

Through the start menu
Through you can open the system properties in Windows 10 in several ways. I find them all inconvenient, but they are there and our guide would be incomplete if we missed them.
Computer settings
This option appeared only in Windows 10. Something similar is available in Windows 8, but there the settings are launched from a different location.

So, click Start > Settings > System > About System > System Information
Via Windows Utilities
In this case, the sequence of clicks will be different
Start > All Apps > System Tools > This PC > in the right-click "Properties" dialog box

My Computer icon in Windows 10
Surely many remember that in previous versions, the "My Computer" icon was located on the desktop. And in the context menu of this icon, there was a “Properties” item. So in this method we use the same icon. We can simply drag it to the desktop with Drag-n-Drop and open the computer properties through its context menu.

This icon is of course different from the "My Computer" one, because in Windows 7 and earlier it was not a shortcut, but a special icon. Now we can only create a shortcut to it, which is why you can see two “Properties” items in the context menu. The second is just properties of the label, so the first is needed.
Through the control panel
System properties can also be opened through the control panel. Which can also be launched in two ways.
Quick access to the control panel in Windows from the keyboard
My favorite way is using the command through the Run applet. You can also type this command in the console.

This method of opening the Control Panel works on Windows 10, however it works for any version of Windows.
Launching the Windows 10 Control Panel via the Start Menu
Click on the following menu items:

Start > All Programs > System Tools-Windows > Control Panel
Open System Properties via Windows 10 Control Panel
In the control panel, you need to open "System and Security", then click the main item "System" or the sub-item "View the amount of RAM and processor speed"

Opening Windows 10 System Properties via Control Panel
When installing Windows 10, the user may think that this OS is the ideal operating system. But there is no limit to perfection. For personal use in Windows 10, you can and should disable a good part of the components in order to free up more PC resources.
Why manual tuning is better and better than automatic
Obviously, after installing a new system, you need to set up your computer with your own hands, and not with one or two one-button programs. All applications are created according to a template, they work according to one scenario with possible small branches.
No program will do what you need specifically. For example, only the user can choose the design to his liking, disable unnecessary services, defragment individual hard disk partitions.
In addition, no program will be able to set up the entire system: some work is aimed at cleaning the disk and registry, others - to optimize services, connect to the Internet, free from "surveillance" and data collection, and so on.
I often help reinstall systems and regularly do this on my computer. I noticed a long time ago that programs that optimize in one click miss a lot of really important things. Very few applications turn off services, I have not met one that would turn off the visual effects of the system and so on.
Settings to be made after installing Windows 10
Windows Store limitation in downloading updates
The Windows Store is a platform through which you can purchase and install free and paid Windows apps. In addition, the "Store" constantly updates installed applications, because when you purchase a program or game, you get a lifetime service. But in some cases, these updates can disrupt the system, take away some resources of the hard drive and RAM, so it's better to disable auto-update:
- In the search, enter Store and select the best match. In the search, enter Store and select the best match
- In the Store window, click on the ellipsis button. Select "Settings".
 In the "Store" window, click on the ellipsis button and select "Settings"
 - In the "Settings" we rearrange the toggle switch in the "Application Update" column to the "Off" state, and then restart the computer.
 In the "Settings" we rearrange the toggle switch in the "Update applications" column to the "Off" state.
Stopping unnecessary services
Services are background processes that keep devices running and act as intermediaries between devices and the operating system. However, some services may work even if there is no device they are communicating with. For example, fax or Bluetooth, which most computers do not have. There is a whole list of services that can be painlessly disabled:

List of services that can be safely disabled on Windows 10:
- "Fax";
- NVIDIA Stereoscopic 3D Driver Service (for NVidia video cards, if you are not using 3D stereo images);
- "Net.Tcp Port Sharing Service";
- "Working folders";
- "AllJoyn Router Service";
- "Application Identity";
- "BitLocker Drive Encryption Service";
- "Bluetooth Support Service" (if you are not using Bluetooth);
- Client License Service (ClipSVC, Windows 10 Store Apps may not work properly after being disabled)
- "Computer Browser";
- Dmwappushservice;
- "Geographic Location Service";
- "Guest shutdown service (Hyper-V)";
- "Pulse Service (Hyper-V)";
- "Hyper-V Virtual Machine Session Service";
- "Hyper-V Time Synchronization Service";
- "Data Exchange Service (Hyper-V)";
- "Hyper-V Remote Desktop Virtualization Service";
- "Sensor Surveillance Service";
- "Sensor Data Service";
- "Sensor Service";
- “Features for connected users and telemetry” (this is one of the options to disable Windows 10 “tracking” of the user);
- "Internet Sharing (ICS)" (provided that you do not use Internet Sharing features, for example, to distribute Wi-Fi from a laptop);
- "Xbox Live Network Service";
- Superfetch (assuming you're using an SSD)
- "Print Manager" (if you do not use the printing features, including the built-in Windows 10 printing to PDF files);
- "Windows Biometric Service";
- "Remote registry";
- "Telephony";
- "Telephone communications";
- "Secondary login" (assuming you don't use it).
Video: How to disable unnecessary services in Windows 10
Checking and installing missing drivers
During the installation of Windows, standard applications are installed that open only the basic capabilities of the device. For maximum PC performance, it is necessary that the latest drivers are installed in the system.
- Press the key combination Win + X and select "Device Manager" in the drop-down menu.
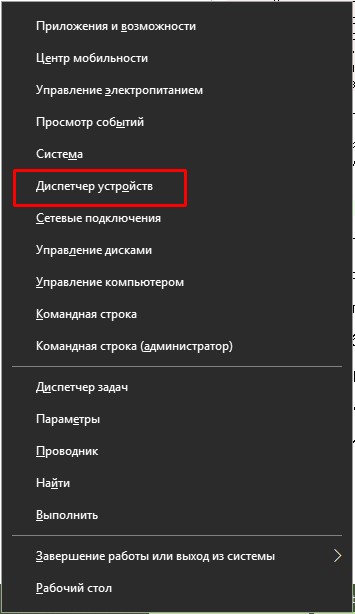 Press the key combination Win + X and select "Device Manager" in the drop-down menu
 - Open the tab with the device, right-click and select "Update driver".
 Open the tab with the device, right-click and select "Update driver"
 - We select "Automatically search for driver updates" and wait until the wizard finishes its work. Then we restart the computer.
 Select the item "Automatically search for driver updates" and wait until the wizard finishes its work
 - Update drivers for the following devices:
- "System Devices";
- "IDE controllers";
- "Video adapters (video cards, video controllers)".
- We restart the computer.
Video: how to update the driver through the "Device Manager"
Checking and installing system updates
The user needs to keep the operating system up to date. To do this, you need to download updates as often as possible. Update components contain important files for the system, virus databases for Defender, and much more.

Disabling auto-update
If for some reason, for example, a small hard drive is installed in your computer, you do not want Windows to keep its components up to date, auto-update can be disabled. However, keep in mind that this is not recommended.

Disabling spyware
With the release of Windows 10, some users have begun to sound the alarm about how much data is being sent to Windows for analysis. It should be noted right away that no one monitors personal passwords and credit card numbers. The system simply collects some metadata to improve its performance. Turning off the collection and sending of data is quite simple, you just need to dig a little in the "Parameters" and "Defender" settings:
- Open Settings and go to the Privacy applet.
 Open "Settings" and go to the "Privacy" applet
 - In the "General" tab, we translate all the toggle switches to the "Off" position.
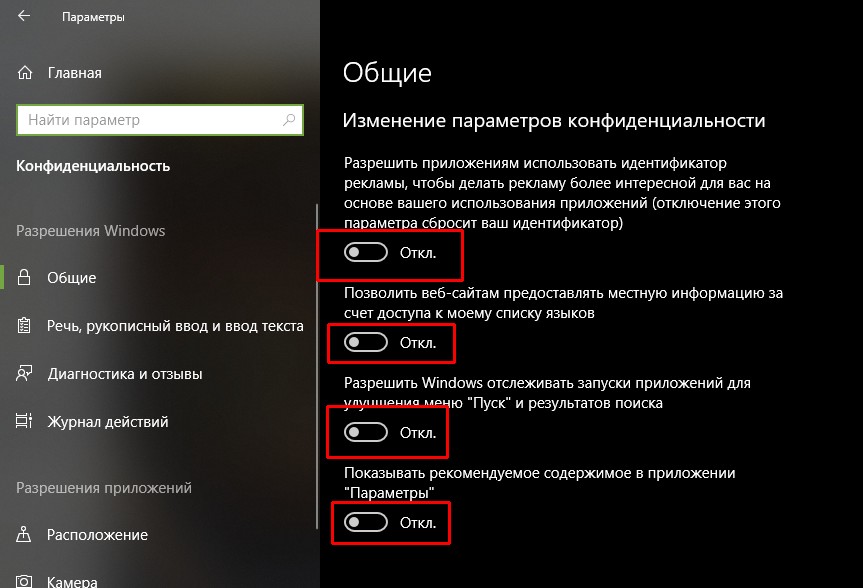 In the "General" tab, we translate all the toggle switches to the "Off" position.
 - In the "Speech, handwriting and text input" tab, click on "Turn off speech services and input suggestions".
 In the "Speech, handwriting and text input" tab, click on "Turn off speech services and input suggestions"
 - In the "Diagnostics and reviews" tab, we also transfer all the toggle switches to the "Off" state.
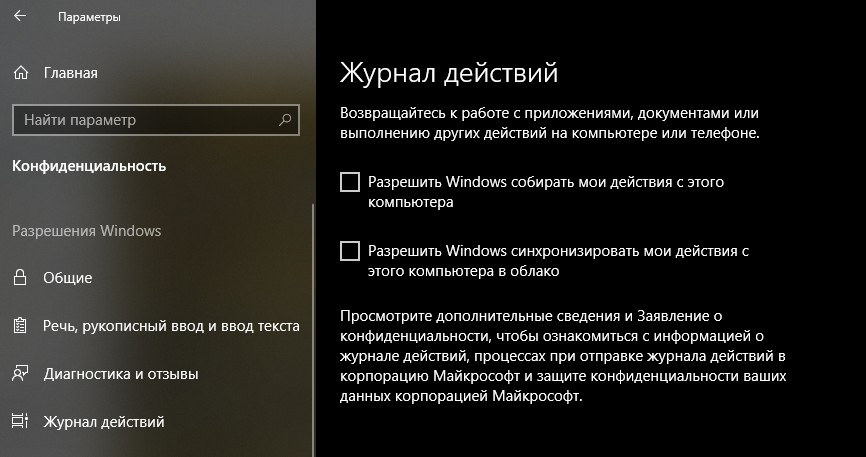 In the "Action Log" tab, uncheck the box "Allow Windows ..."
 - We restart the computer.
Experience shows that different versions and builds of operating systems track different data, so the Privacy applet may contain more or less tracking settings. The system update for a specific period also plays a role. The location of the toggle switches in the tabs may differ. It is recommended that you review the "Privacy" section carefully.
Garbage removal
After installing the operating system, there is usually no garbage in it. But if the new OS was installed without overwriting the old one, the Windows.old folder may well appear on the system disk, which cannot be deleted using simple methods. The Disk Cleanup utility will help with this.

Minimizing the set of effects
Visual effects (taskbar animation, window shadow casting, etc.) are certainly beautiful and pleasing to the eye, but they have too much impact on RAM and video memory. It's better to turn them off:

Video: how to turn off visual effects
Disable background apps
Windows 10 has a lot of standard apps that, like services, run in the background. They cannot be blamed for excessive use of resources, however, these programs are best disabled:

Optimizing and making a freshly installed operating system work is very important and quite simple. It is enough to disable everything unnecessary, and Windows will be configured for maximum performance.
Windows Explorer improvements
Universal and built-in applications. New Windows Store
What features are we losing when we move to Windows 10?
Settings app
Tablet mode, Aero Snap and other improvements
Microsoft Edge
If you used the Settings application in Windows 8 and 8.1, then you are familiar with its main problem - you open the application, understand that the necessary functions are not presented and safely go to the Control Panel.
Indeed, the Control Panel has remained in Windows 10, and if you are an advanced user, you will use this tool from time to time. However, most regular users will never use the panel's services.
The Settings app has become a more comprehensive and functional solution with a logical arrangement of individual controls.
In early preview builds of Windows 10, it seemed that the Control Panel would still dominate the fine-tuning of the system, but that changed very quickly - now "Settings" contains everything you need in 9 different sections.
With constant testing of the new OS, the techradar.pro expert last used the Control Panel in March. This indicates a rare need to look there to resolve any configuration issues, now all this is conveniently done using the Settings application.
There are a few things left that require the Control Panel, for example, to reset the network adapter settings - but you must admit that these manipulations do not have to be performed often.
Each category in "Settings" contains subcategories with concise names. The application is not as intuitive as the Control Panel, but the user can always find what he needs. There has been a pretty major breakthrough compared to the similar tool in Windows 8 and 8.1.

English-speaking users will not only be able to call the Settings application using the Cortana voice assistant, but also select a specific subsection. Unlike Windows 8, search usually finds exactly the categories you need, and not everything in a row.

The Windows 10 operating system tries to do everything itself: from installing drivers to optimizing applications. It turns out well for her, but if you leave all the important processes to the conscience of the operating system, you will soon find a bunch of incomprehensible applications and services that will periodically start, update themselves and eat up all the resources of your computer. If you want to configure Windows 10 so that your computer does not have to share performance with incomprehensible services, while leaving everything useful that the system can give you, you will have to combine automatic installation with manual. This is not so easy to do, because Windows 10 practically does not tolerate interference in its processes, but if you follow all the instructions below exactly, then you will not have any problems setting it up. And if some of the possible errors associated with the installation and configuration of the system occur, then we will help you eliminate them completely.
Why set up Windows 10 manually
One of the main prides of Windows 10 is the complete automation of everything that is possible, including setting up and optimizing the operating system itself. The idealized way to get Windows 10 ready for use, as Microsoft sees it, is as simple as it gets:
- You are installing Windows 10.
- The system starts up, downloads all drivers and updates by itself, configures itself and restarts.
- Windows 10 is ready to go.
In principle, this scheme works quite well, at least in most cases. And if you have a relatively good computer and you do not experience discomfort after the automatic setup of Windows 10, you can leave everything as it is.
And now we list the disadvantages of automatic tuning:
- Microsoft has a lot of low-quality programs and games that need to be promoted somehow - some of them will be installed automatically on your computer;
- Microsoft wants you to pay or watch ads, or better yet, all at once;
- automatic configuration of Windows 10 does not take into account outdated and weak hardware;
- Windows 10 is the most spying operating system ever, and it collects information at the expense of your computer's resources;
- a huge number of secondary services that work in the background and eat up RAM;
- automatic system updates that can take you by surprise;
- app updates, service updates, and everything updated to eat as much resources and traffic as possible;
- far from everything works perfectly and failures are possible, and the system will not show it.
Roughly speaking, without manual configuration, the computer will be used not only by you, but also by services that you absolutely do not need, which fully fit the definition of virus.
At the same time, Windows 10 is a surprisingly good and very productive system that really does a lot of good things automatically. If you want to cut out all the junk and keep all the good things that Windows 10 can give you without turning the system into a log along the way, you have to spend a little time and do manual configuration. It will take you about two hours, but at the end you will get the best system available, and for free.
Settings to be made after installing the OS
As mentioned above, setting up Windows 10 is time consuming and will take much longer than in the case of previous versions. The main task will be to limit the amount of rubbish downloaded, while allowing everything else to install, and then wipe and disable everything that could not be prevented.
The sequence of points is very important, try not to disturb the order and restart the computer after each step.
Store activation and restriction
The main task of this stage is to restrict the store through the firewall, Windows activation can be done at the very end of the setup, but it's better now.
If your computer is already connected to the Internet, terminate the connection as soon as possible.
After connecting to the Internet, the bulk download of drivers, updates and applications will begin. Let's deal with preventing the download of unnecessary applications.
- Open the "Start" menu, find "Store" there and launch it.
Open the "Start" menu, find "Store" there and launch it
- Click on the profile button at the top of the window that opens and select "Settings".
Click on the profile button at the top of the window that opens and select "Settings"
- Uncheck automatic app updates.
Uncheck automatic app updates
- Now find the control panel through the search and open it.
Find the control panel through the search and open it
- Go to the System and Security category.
- Open "Allow apps through Windows Firewall".
Open "Allow apps through Windows Firewall"
- Click "Change Settings", find "Store" in the list and deselect it from all checkboxes. Then confirm the changes.
Click "Change settings", find "Store" in the list and deselect it all
- Now it is desirable to activate Windows. It is best to use a KMS activator. If you have not prepared the activator in advance, download it from another device, since it is advisable to make the first Internet connection with Windows 10 already activated.
The best way to activate Windows 10 is to use a KMS activator
- Restart your computer.
Restart your computer
System autotuning
Now it's time to let Windows set itself up. This is the key point at which the Internet turns on.
- In the previous step, we limited the Microsoft Store, but on some versions of Windows 10 this may not help (very rare cases). Launch the store again, click on the user button and open Downloads and Updates.
Launch the store again, click on the user button and open "Downloads and Updates"
- Drag the window down so it doesn't get in your way. Throughout the current stage, periodically look at the store window. If a download icon appears (marked green in the screenshot), click "Stop All" and go through the crosses on all applications from the download queue. There are no necessary applications and important updates here.
If the download icon appears (marked in green), click "Stop All" and go through the crosses on all applications from the download queue
- Now it is highly desirable to connect all devices to your computer: printer, joystick, and so on. If you use several screens, connect everything, press the key combination "Win + P" and select the "Expand" mode (that's it, change it after reboot).
If you are using multiple screens, connect all, press the key combination "Win + P" and select the "Expand" mode
- It's time to connect to the internet. Windows 10 should do this driverless, but if you're having problems, install a driver for your network card or Wi-Fi module (download only from the manufacturer's website). More details about manual installation of drivers are described in the next step. Now you only need to connect to the Internet.
Windows 10 should see the Internet without drivers, but if you have problems, install the driver for the network card or Wi-Fi module
- Now the bulk download, installation and optimization will begin. Do not try to do anything with the computer: the system needs all possible resources. Windows will not notify you about the end of the process - you have to guess yourself. Your guide will be the moment you install the driver for the video card: the correct screen resolution will be set. After that, wait another 30 minutes and restart your computer. If the resolution does not change even after an hour and a half, or the system itself will report completion, restart the computer.
Installing missing drivers
As mentioned above, Windows 10 auto-tuning can fail, which is especially true in the case of installing drivers on outdated hardware, which is not taken into account. Even if it seems to you that all the drivers are in place, it is better to check it yourself.
- Open the Control Panel and expand the Hardware and Sound category.
Open Control Panel and expand the Hardware and Sound category
- Go to "Device Manager".
Go to "Device Manager"
- Now you need to find all devices with a yellow triangle on the icon, they will be visible immediately. If this is found, right-click on it and select "Update driver".
You need to find all devices with a yellow triangle on the icon and update their drivers
- Choose automatic search. Then the system will tell everything itself.
Choose automatic search, then the system will tell everything itself
- If it does not help, which is very likely, right-click on the device again and go to its properties.
Right click on the device and go to its properties
- The "General" tab will contain all the information that the system can learn about this equipment. Based on this data, you need to find on the Internet, download and install the missing driver yourself. If the manufacturer is listed, first of all go to his website and look there. Drivers should only be downloaded from official sites.
Based on the data that has opened, you need to find on the Internet, download and install the missing driver yourself
If you have any problems installing the drivers, follow the link below with an article on this topic or watch a short video on manual driver installation.
Video: how to manually install the driver on Windows 10
System update
There are a lot of variations of Windows 10, tailored for different hardware and bitness, but during installation, a universal version of the system is installed to minimize the size of the image. Windows 10 has an update center that automatically updates the system to the latest version and changes the Windows variation to the most compatible one. We are not interested in updating the version: the changes are minimal, completely invisible and not always useful. But optimization is very important.
As with the second launch, this step can take a long time.

If nothing was found, then the system has already managed to update itself.
Ensuring maximum performance
Disabling auto-updates
You should start by disabling auto-updates of the system. Updates for Windows 10 come out very often and do not contain anything useful for ordinary users. But on the other hand, they know how to start up on their own at the most inopportune moment, which puts pressure on the performance of your computer. And after you want to reboot quickly, you have to suddenly wait half an hour until the updates are accepted.
You will still be able to update the system as described in the previous step, but now you will be in control of this process.
- Through the search, go to "gpedit.msc".
Through the search, go to "gpedit.msc"
- Follow the path "Computer Configuration / Administrative Templates / Windows Components" and click on "Windows Update".
Go to "Computer Configuration / Administrative Templates / Windows Components" and click on "Windows Update"
- Open "Auto Update Settings".
Open "Setting Automatic Updates"
- Check the "Disable" box and confirm the changes. You don't need to reboot just yet.
Check "Disable" and confirm changes
General restriction of services
As you probably know, Windows 10 is actively spying on its users. But you do not need to worry about your personal data: Microsoft is not interested in them. You need to worry about the resources of your computer that are spent on this espionage.
In order not to waste time digging into the corners of your system, we will use the Destroy Windows Spying program, which will not only protect your computer from spying, but also remove all associated threats to your computer's performance.

Radical restriction of services
The Destroy Windows 10 Spying program only kills the most annoying processes, but much remains untouched. If you are determined to be sterile, you can perform a finer cleaning of services using the ShutUp10 program.

Installing programs
Windows 10 is almost ready to go, it remains only to clean up the remaining garbage and heal registry errors. You can do this now, but it's better after you install everything you need, as new errors and garbage may appear.
Install programs and games, configure your browser and do everything you are used to. In terms of required software, Windows 10 has the same requirements as previous versions, with a few exceptions.
Here are the programs that are already wired and you do not need to install them:
- archiver;
- image emulator;
- DirectX or its updates;
- antivirus (if you are not very good at navigating the Internet, then it is better to ignore our advice and still install a third-party antivirus).
If you are in doubt about the set of necessary software, here is an exhaustive list of programs that you may need in the future:
- third-party browser (preferably Google Chrome or Mozilla Firefox);
- Microsoft Office (Word, Excel and PowerPoint);
- Adobe Acrobat;
- players for music and video (we recommend AIMP for music and KMPlayer for video);
- GIF Viever or other third party gif viewer;
- skype;
- steam;
- Ccleaner (it will be discussed below);
- translator (for example, PROMT);
- antivirus (installing it on Windows 10 is rarely useful, but this is a very controversial issue - if you decide, we recommend Avast).
At the end, don't forget to restart your computer.
Garbage, Registry and Ccleaner
After installing programs and updates, a decent amount of registry errors and temporary files, also called junk files, should accumulate on your computer.
- Download, install and run CCleaner. In the "Cleanup" tab in the Windows section, check all items except "Network passwords", "Shortcuts and in the Start menu", "Shortcuts on the desktop" and the entire "Other" group. If you set up Microsoft Edge and plan to use it, you should not mark its group either. Do not rush to start cleaning.
In the "Cleaning" tab in the Windows section, check all items except "Network passwords", "Shortcuts and in the Start menu", "Shortcuts on the desktop" and the entire group "Other"
- Go to the "Applications" section and uncheck all the checkboxes there. Now click "Clear".
Go to the "Applications" section and uncheck all the checkboxes there, then click "Clear"
- Open the Registry tab and click Scan for Issues.
Open the "Registry" tab and click "Check for Issues"
- When the analysis is complete, click "Fix Selected...".
When the analysis is complete, click "Fix Selected..."
- It's best to keep backups.
- Now click "Fix Marked".
Now click "Fix Marked"
- Go to the service tab. In the "Uninstall programs" section, you can erase all optional applications that managed to slip during the system update. You won't be able to do this with standard methods.
In the "Uninstall programs" section, you can erase all optional applications that managed to slip during the system update
- Go to the "Startup" section. In the internal tab of Windows, select all the items and click "Turn off".
In the internal tab of Windows, select all the items and click "Turn off"
- Go to the internal "Scheduled Tasks" tab and repeat the previous step. After restart your computer.
Go to the internal tab "Scheduled Tasks" and repeat the previous step
It is advisable to leave the Cceaner program on the computer and check the system for registry errors every few months.
grub recovery
If your computer is running Linux in parallel, then after installing Windows 10, a not very pleasant surprise will await you: when you turn on the computer, you will no longer see the Grub operating system selection menu - instead, Windows will start loading immediately. The fact is that Windows 10 uses its own bootloader, which is automatically installed along with the system itself and completely overwrites Grub.
You can still bring Grub back in the normal way using the LiveCD, but in the case of Windows 10, everything can be done much easier through the command line.

Video: 4 ways to restore Grub
Possible problems and solutions
Unfortunately, the installation of Windows 10 does not always go smoothly, as a result of which errors may occur, from which no one is immune. But most of them are treated very simply and even inexperienced users can eliminate them.
General way (solves most problems)
Before moving on to a detailed examination of each problem, we will describe the general way to resolve errors provided by Windows 10 itself.

Lost hard drive
- Open the Start menu and search for "diskmgmt.msc".
Open the start menu and search for "diskmgmt.msc"
- If you see an unrecognized disk at the bottom of the window, click on it and select "Initialize Disk".
If you see an unrecognized disk at the bottom of the window, click on it and select "Initialize Disk"
- If there is no unrecognized disk, but there is unallocated space, click on it and select "Create a simple volume".
If there is unallocated space, click on it and select "Create a simple volume"
- Leave the maximum value unchanged and click Next.
Leave the maximum value unchanged and click "Next"
- Assign the volume its initial letter and click Next.
Assign the volume its initial letter and click "Next"
- Select NTFS as the file system.
Select NTFS as the file system
Sound problems
Before proceeding with this instruction, try the general method that is described at the beginning of the chapter.
- Right-click on the sound icon in the taskbar and select Playback Devices.
right-click on the sound icon in the taskbar and select "Playback Devices"
- Right-click on the active device and go to its properties.
Right click on the active device and go to its properties
- Open the "Advanced" tab, set the minimum audio format and apply the changes.
Open the "Advanced" tab, set the minimum audio format and apply the changes
If you have a laptop and this method does not help you, install the original drivers from the manufacturer.
Blue screen
This problem usually occurs during the installation of updates, when it prematurely tries to display the system boot screen. The correct solution is to simply wait for the updates to install (this can take up to an hour). But if this does not help, you do not have time or you are firmly convinced that the system is frozen, you can restart the computer: the system will not try to install updates again and will start immediately. You can do this in two ways:

Black screen
If immediately after turning on the computer shows you a black monitor, you are faced with an error in the video driver that has flown down or a problem with its compatibility. The reason for this is the auto-installation of the wrong driver. If you encounter this problem, you need to manually install the video driver from the manufacturer, but this will be a little more difficult, since you will not be able to log into the system.
Also, this problem can occur if you installed the x86 driver on a 64-bit system (usually there are no problems with this, but sometimes exceptions occur). If you cannot find a suitable driver, you will have to reinstall the system to a different bit depth.
In rare cases, this problem may be related to another driver that is not related to the video card.

Computer slows down or heats up
The problem lies in the persistent attempts of services to update, which they do not always succeed in. If you're experiencing this problem, it means you haven't done the steps in the "Ensuring the best performance" step - be sure to do them.
If you are dealing with a laptop and it has not stopped warming up, try installing official drivers from manufacturers (the desired driver should be called ChipSet). If this does not help, you will have to limit the processor power (this does not mean that now it will work below the norm: Windows 10 just made a mistake and uses the processor in a merciless mode).
- Open the Control Panel and navigate to the System and Security category.
Click "Change advanced power settings"
- Expand "Processor Power Management", then "Maximum Processor State" and set both values to 85%. After confirm the changes and restart your computer.
Set both values to 85%, confirm the changes and restart your computer
There was a choice of OS
If you didn't format your system drive when installing Windows 10, you might get a similar error. The reason is that the previous operating system was not properly uninstalled and now your computer thinks it has multiple systems installed.

Screen flickering
Usually the cause of this problem is a driver mismatch, but there are exceptions in the form of two conflicting services. So do not rush to install official drivers and try another method first.
- Use the key combination "Ctrl + Shift + Esc" to call the task manager and click "Details".
Call the task manager and click "Details"
- Go to the Services tab and click Open Services.
Click "Open Services"
- Find "Control Panel Item Support..." here, right-click on it and select "Properties".

In the startup type, select "Disabled" and confirm the changes
- Now find "Windows Error Reporting Service" and repeat the same with it. After restart your computer.
Find "Windows Error Reporting Service" and repeat the same with it
- If all else fails, install the driver for the video card from the manufacturer.
There is no Internet connection, the monitor resolution has changed, or the system does not see the video card
If you came to this section, you need to install the factory drivers, which are posted on the manufacturer's website. Especially often, owners of Chinese laptops that use rare hardware or its modified versions face similar problems. The main reason for the problem is that Windows 10 cannot clearly recognize one of the components of your computer (for example, a video card) and tries to install the most appropriate driver, which does not fit at all.
If you have a laptop and can't find a driver for your graphics card, look for a VGA driver.
Battery problems
The problem with the battery in laptops is almost the most common, especially for the Lenovo brand. Most often, it is presented in the form of a message: "Battery is connected, but not charging." The developers of Windows 10 are well aware of all this: if you use the general problem solving method that is presented at the very beginning, Windows will independently analyze your computer, determine all possible causes of the problem, and tell you about the options for fixing the error.
The Windows 10 Troubleshooter can fix every problem you can with your laptop's battery.
Also try to go to the website of your laptop manufacturer and download the Chipset driver there - Windows will not tell you about this option.
When upgrading to Windows 10, Kaspersky or another program was deleted
Windows 10 really dislikes intrusions into its system processes and everything that threatens them. If your antivirus, Ccleaner or other similar program disappeared during the system update, then they were listed as potentially dangerous and Windows removed them as a threat. This cannot be changed, but you can reinstall the lost program. But if you reinstall Windows and select the "System Update" option, everything will be deleted again.
Manually configuring Windows 10 is a bit of a chore, but doing it all will give you the best and most productive system available. Moreover, Windows 10 is very self-sufficient and very rarely needs to be reinstalled, which means you will have to do all this infrequently.


Popular
- Why PC-Radio does not work: the main reasons and their solution Pc radio why there is no sound
- Mind map software iMindMap Mind map software
- Windows System Restore Set up automatic creation of restore points
- Why PC-Radio does not work: the main reasons and their solution
- Programs for creating mind maps
- Mind Mapping Software iMindMap Best Mind Mapping Software
- Web design for beginners
- Yandex disk for collaboration
- How to secure your computer
- Web design lessons from scratch